
JamesOS / FM-1 · Quick start
Make your first beat.
Three synth tracks, four drum lanes, one intuitive way to play your FM-1. Use this guide to make your first beat.
1. Install JamesOS
Back up your projects and patterns before installing. If you already use JamesOS, save your current edits and download all saved projects with the Editor. For other firmware, use its compatible backup tool. The installer does not create a backup. If you have projects made with 1.0a, read projects made with JamesOS 1.0a first.
- On a desktop computer, open Chrome or Edge and visit the JamesOS installer.
- Connect the powered-on FM-1 directly to the computer with a USB data cable. Close other music software using the FM-1 and stop playback.
- Open the installer, allow MIDI access, and follow the on-screen connection, review and installation steps. Keep the FM-1 connected and the browser open until the instrument restarts and the installer confirms it.
Installing unofficial firmware may void your warranty. An interrupted installation can leave the instrument unresponsive. See backups and recovery.
2. Make a sound
Connect headphones or speakers, switch on your FM-1 and turn the volume up gradually.
- The screen opens on HOME. Play the keyboard. OCT− and OCT+ move the octave.
- Turn KNOB 1 and KNOB 2 (TIMBRE, HARMONICS) and listen to how they change the tone of played notes.
- Turn the PRESETS encoder to change the synth engine.
- Press SEL, turn KNOB 1 (or SELECT) to browse 128 starting sounds (audition them with the keyboard), then press SEL again to select and keep one.
- Turn the ALGORITHM encoder to switch tracks. T1, T2 and T3 are synth tracks; DK is the drum kit.
3. Make a beat
- Select the drum kit DK. Press SEQ: the keyboard becomes a step grid. Turn SELECT to choose drum lane D1, then tap WHITE KEYS on the keyboard to add or remove hits. Choose D2–D4 to add other drum sounds.
- Press PLAY. To set the tempo, press OCT− + GLO to open TEMPO and turn KNOB 1 (BPM).
- Select a synth track, press SEQ, tap steps, and hold a step for a moment to set its note, length, velocity and condition.
4. Mix and master
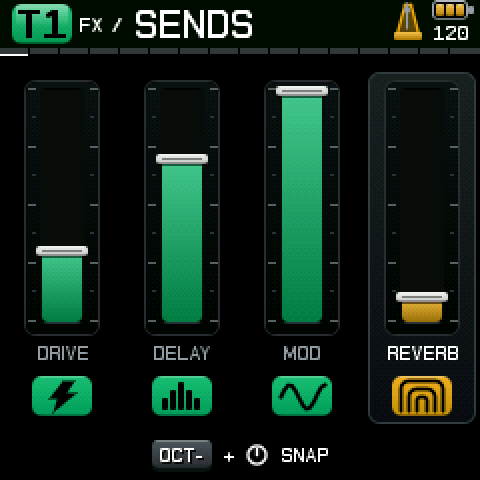
- Press FX. The first screen is the send levels for DRIVE, DELAY, MODULATION, REVERB. Turn the four knobs to adjust the sends.
- Press FX again for the effect settings.
- Reverb is shared by all tracks (the GLOBAL tag); the rest belong to the track (the TRACK tag).
- GLO opens the mixer: knobs 1–4 set the track levels and select the track; OCT− mutes, OCT+ solos.
- Select DK and press EDIT for KIT LEVEL and individual drum-lane levels, mute and solo.
- On DK, ARP opens RETRIGGER: hold a lit step to set extra hits and spacing with knobs 1 and 2.
- Stop playback, then press SAVE to open the SAVE menu. SAVE again quick-saves the current project. If there is no current slot, choose a slot and name first. Always save before switching off.
5. Handy gestures
| Do this | To get |
|---|---|
| Hold HOME for 0.8 s | Notes keep sounding after you let go (HOLD) |
| Hold ARP for 0.8 s on a synth track | Arpeggiator on or off |
| Hold GLO, turn SELECT | Jump to the master filter page |
| Turn SELECT outside a browser, drum grid or menu | Sweep the master filter |
| On FX SENDS, hold OCT− and turn a knob | Snap the send to 0%, 50% or 100% |
| Hold the RIGHTMOST BLACK KEY on the keyboard | Punch-in effects with the other keys |
| Hold SEQ, turn KNOB 1 | Pattern length |
The screen shows a hint while you hold a gesture button. Turn MONITOR on in TEMPO to see audio CPU load on the bottom two pixel rows.
Full manual
JamesOS is free community firmware for the M-VAVE FM-1 with three synth tracks, a four-lane drum kit, track effects, a shared reverb and a sequencer. Start with the quick start for a first beat, or check the backup and recovery notes.
Warranty and risk. Installing unofficial firmware may void your hardware warranty. An interrupted update can leave the instrument unresponsive. JamesOS comes with no warranty (GNU GPL v3, sections 15 and 16). Back up your work before updating. JamesOS is not made or endorsed by the manufacturer of the FM-1.
1. The instrument at a glance
- T1, T2 and T3 are synth tracks. Each can use any of the 24 Plaits engines, with its own sound, envelopes and two LFOs. Each track has two patches for routing modulation.
- DK is the on-screen name for track 4 (T4). This drum track has four lanes, D1–D4. Choose the BRAIDS or PLAITS kit engine, or browse 80S and 90S starting kits built on PLAITS. Each lane has three voice choices.
- Track effects are drive, delay and modulation. All four tracks also feed one shared reverb. The master section adds a filter, pan controls, heat and a compressor. Punch-in effects act on the finished mix.
- Sequencing gives each track up to 64 steps in four banks. Notes, hit length, velocity, microtiming and conditions can be edited per step. Synth tracks have an arpeggiator; drum hits can have retriggers.
- Starting sounds include 128 synth sounds and 12 drum-kit starting points. There are 12 project slots for your own work.
2. Controls
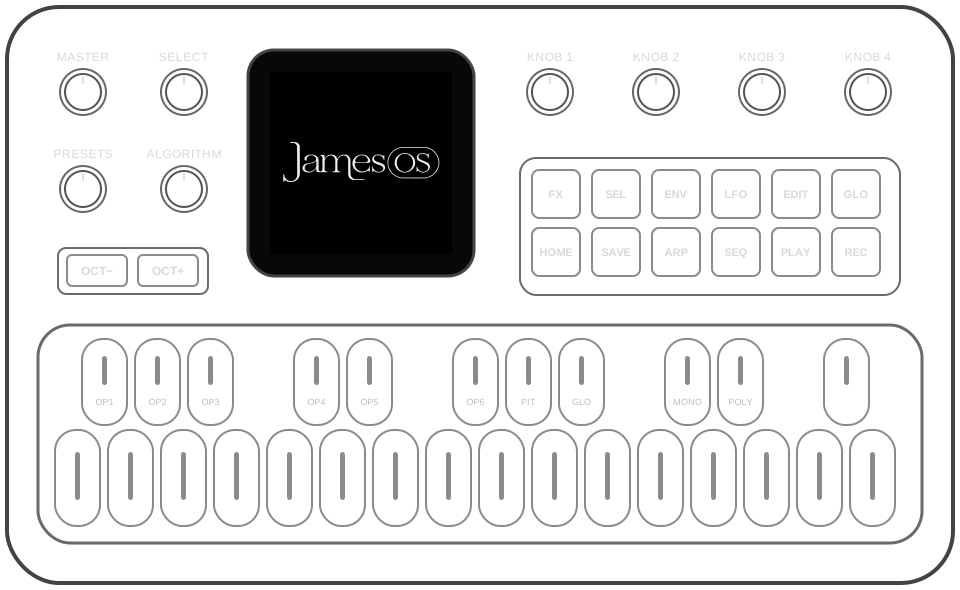
Buttons
Press a page button once to open its first screen. Press it again to move to the next screen in that group.
| Button | What it does |
|---|---|
| HOME | Sound controls and the track filter. OCT− + HOME opens or leaves MOD DEPTHS and VOICE. Hold HOME for 0.8 seconds to toggle HOLD. |
| ENV | AMP envelope, FILTER envelope, then envelope SETUP. |
| FX | SENDS, DRIVE, DELAY, MODULATION, then REVERB. |
| GLO | Mixer and master controls. Press OCT− + GLO for TEMPO and MIDI settings. Hold and turn SELECT for the master filter shortcut. |
| SEQ | Step grid, then sequencer settings. Hold and turn KNOB 1 to change pattern length. |
| ARP | Synth arpeggiator; on DK, opens RETRIGGER. On synth tracks, hold for 0.8 seconds to toggle the arpeggiator. |
| SEL | Browse SOUNDS or DRUM KITS. Press again to keep the highlighted sound. |
| LFO | Cycle through LFO 1, LFO 2 and GLOBAL LFO. |
| EDIT | Cycle through KIT LEVEL, PATCH 1 and PATCH 2. |
| PLAY | Start or stop the sequencer. The indicator is green while stopped and red while playing. |
| REC | Arm or disarm recording. |
| SAVE | Open the SAVE menu. Follow the actions shown in its bottom bar. |
| OCT− | Lower the synth octave. OCT− often acts as a Function key when held with another control; see the page-specific actions below. |
| OCT+ | Raise the synth octave, or perform the page-specific actions below. |
Knobs and encoders
KNOBS 1–4 match the four control columns. The active knob badge is highlighted; a dotted icon with an X means there is no parameter for that knob on this page. Turn faster to move more quickly through continuous values. Discrete choices such as engine or note selections keep their individual steps.
ALGORITHM selects T1, T2, T3 or DK. On KIT LEVEL it is inactive; leave that page before changing track.
PRESETS selects a synth engine without changing its other sound settings. On drum HOME it chooses the kit engine; on the drum sequencer, KIT LEVEL and RETRIGGER it chooses the selected lane's voice. In SOUNDS or DRUM KITS it scrolls the browser.
SELECT normally sweeps the master filter. In SOUNDS or DRUM KITS it scrolls; on the drum step grid and RETRIGGER it selects a lane. SAVE screens use it for their own selection. These page-specific functions take priority over the filter shortcut.
Keyboard and octave buttons
The 27 keys play the selected synth on HOME and parameter pages. The octave buttons shift synth notes by up to two octaves; their lights show the current octave. Drum sounds have no octave shift. On SEQ, the WHITE KEYS on the keyboard become the step grid. RETRIGGER and KIT LEVEL have their own input rules.
| Where | OCT− / OCT+ |
|---|---|
| Global MIXER | Toggle mute / solo for the selected track. |
| KIT LEVEL | Toggle mute / solo for the selected drum lane. |
| SEQ grid or RETRIGGER | Previous / next bank of 16 steps. |
| While editing a SEQ step | Nudge its timing earlier / later, in 1/128-note increments. |
| SEQ settings | No action. |
| PUNCH FX | Previous / next settings page. |
| SOUNDS browser on a synth track | Change the audition octave. |
| SAVE screens | Use the SAVE and PLAY button actions shown on screen. |
Reading the screen
Track colours identify the selected track. Goldenrod identifies global controls, including shared reverb and Punch FX. A TRACK badge means the effect settings belong to the selected track. A GLOBAL badge means the effect is shared, though its send can still be per track.
The header shows the track or globe badge, page title, tempo and battery. The metronome swings once across per beat and centres while stopped. Small dots above the bottom cue bar show your position in a page group. Rounded button cues explain shortcuts; brief status messages temporarily replace them.
SCREEN GUIDE
Reading the screen graphics
These examples come from the firmware. Shapes, levels and colours respond to the current sound and settings; the labels and values on the screen identify the control.
3. Pages
The screenshots and control graphics show examples of the screens. Values, track colours and graphics respond as you play and turn the controls.
HOME and kits · ENV · FX · GLO · SEQ · ARP · RETRIGGER · SEL · LFO · EDIT / KIT LEVEL · Modulation · PUNCH FX
HOME
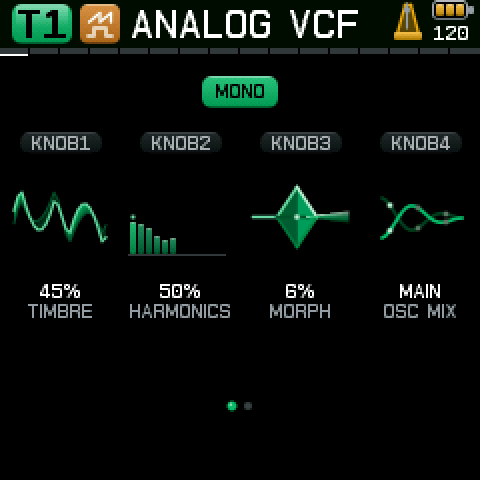
On a synth track, HOME shows TIMBRE, HARMONICS, MORPH and OSC MIX. The first three shape the selected engine. OSC MIX blends its MAIN and AUX outputs; their sounds depend on the engine. Turn PRESETS to choose a different engine.
Press OCT− + HOME to open the deep menu. Press HOME to move between its two pages; press OCT− + HOME again to return to the sound pages.
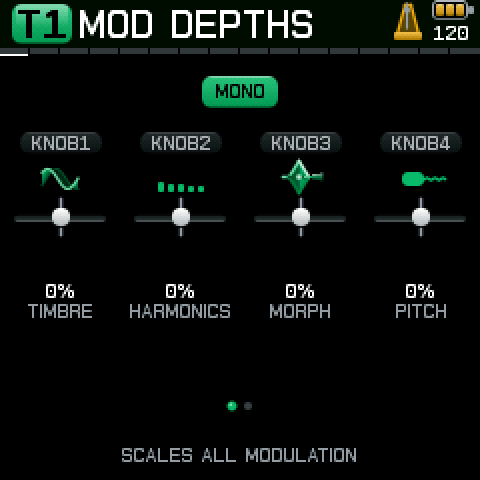
MOD DEPTHS adjusts the combined modulation reaching TIMBRE, HARMONICS, MORPH and PITCH. Zero leaves the routed modulation unchanged. Positive values increase its depth; negative values reduce it.
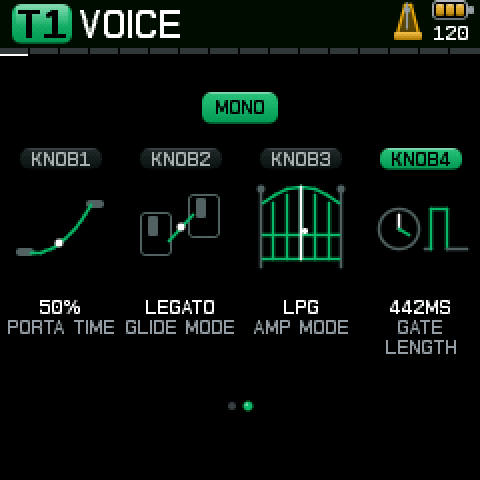
On a synth track, PORTA TIME sets portamento from 0% to 100%, up to two seconds per octave. GLIDE MODE selects OFF, LEGATO (glide when notes overlap), or ALWAYS (glide from the previous pitch). AMP MODE selects the normal ENVELOPE or LPG, which couples a low-pass gate to the amplitude envelope. In LPG mode, GATE LENGTH limits how long a held note plays, from 10 ms to 2 seconds; OFF follows the key hold, and releasing a key early closes the gate. LPG uses a fixed 2 ms close; the amp RELEASE control is hidden in LPG mode. These controls are inactive on the drum kit.
On DK, turn PRESETS on HOME to choose BRAIDS or PLAITS. Use SEL to browse the starting kits, including 80S and 90S:
| Kit | KNOB 1 | KNOB 2 | KNOB 3 | KNOB 4 |
|---|---|---|---|---|
| BRAIDS KIT | TIMBRE | COLOR | SNAP | GATE |
| PLAITS KIT | TIMBRE | HARMONICS | MORPH | GATE |
The 80S and 90S starting kits use the PLAITS engine, so their HOME controls are TIMBRE, HARMONICS, MORPH and GATE. SNAP adjusts the attack character of the BRAIDS kit. GATE limits each hit's duration; OPEN lets its natural tail play. A shorter held-step LENGTH takes precedence. GATE is temporary and returns to OPEN when a session loads.
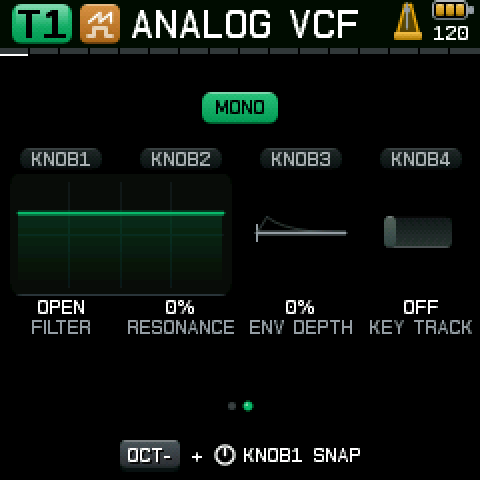
Press HOME again for the track filter: FILTER, RESONANCE, ENV DEPTH, KEY TRACK. FILTER spans low-pass through open to high-pass. ENV DEPTH is bipolar: it sets how much the filter envelope moves the filter. KEY TRACK switches note-based cutoff tracking on or off. The track filter and master filter are separate stages. On the track filter page, make a fresh OCT− hold and turn KNOB 1 to snap toward the low-pass end, open midpoint or high-pass end. Keep holding OCT− and turn again to move between those points.
ENV
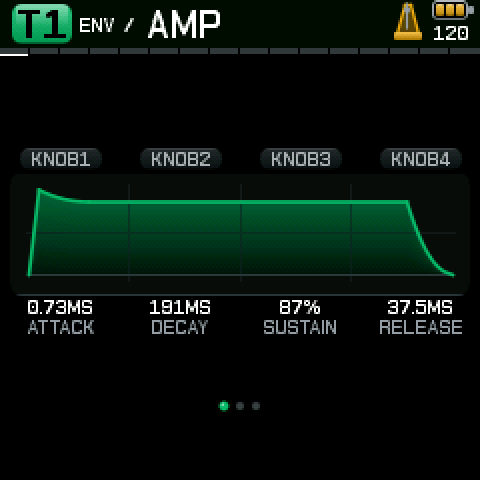
Three screens:
| Screen | Controls |
|---|---|
| ENV / AMP | ATTACK, DECAY, SUSTAIN, RELEASE of the sound's volume. |
| ENV / FILTER | ATTACK, DECAY, SUSTAIN, RELEASE of the modulation envelope. |
| ENV / SETUP | INTENSITY, TARGET, LOOP, RETRIGGER for that modulation envelope. |
HOME filter ENV DEPTH adds a separate amount of the modulation envelope to the filter. The envelope SETUP target and intensity can also route that envelope to a destination. See modulation for the interaction with PATCH.
FX
The drum track and all three synth tracks have these five screens:
| Screen | Controls |
|---|---|
| SENDS | DRIVE, DELAY, MODULATION, REVERB levels for the selected track. |
| DRIVE | MODE (OVERDRIVE, DISTORT or FUZZ), GAIN, TONE, BIAS. |
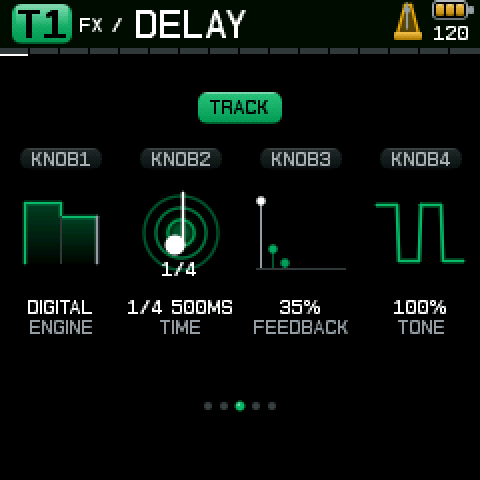
| DELAY | ENGINE (DIGITAL, TAPE ECHO, MULTITAP or GLITCH), TIME, FEEDBACK, TONE. |
| MODULATION | ENGINE (CHORUS, FLANGE, PHASER or VIBRATO), RATE, DEPTH, FEEDBACK. |
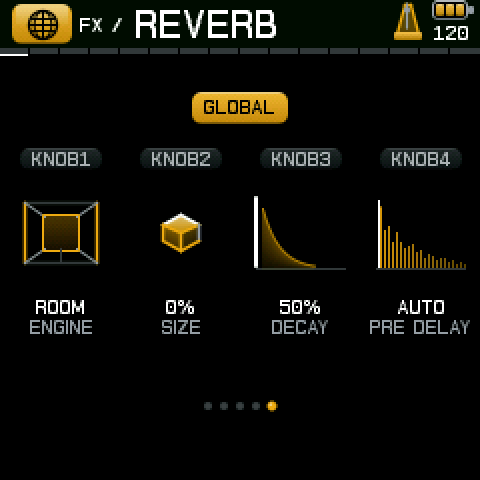
| REVERB | ENGINE (ROOM, HALL or SPACE), SIZE, DECAY, PRE DELAY. |
Use SENDS to set how much of each effect the selected track receives.
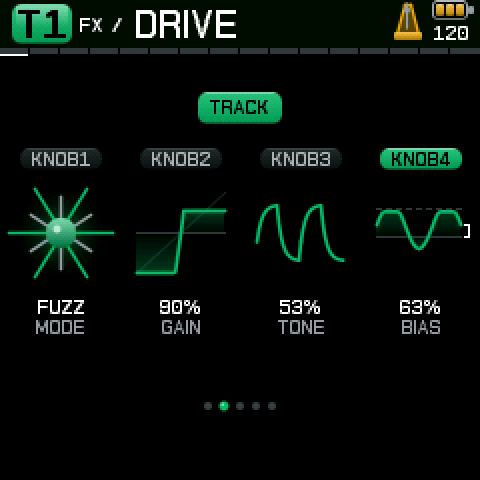
On DRIVE, GAIN sets the strength of the distortion, TONE adjusts its brightness, and BIAS changes its character by offsetting the distortion. At zero bias each drive mode uses its natural character; higher settings add asymmetry.
On DELAY, TIME selects a tempo-synchronised note division, FEEDBACK controls the repeats, and TONE darkens or brightens them. T means triplet (two-thirds of the named note); D means dotted (one and a half times the named note). At 120 BPM, 1/4 is 500 ms, 1/4T is about 333 ms and 1/4D is 750 ms.
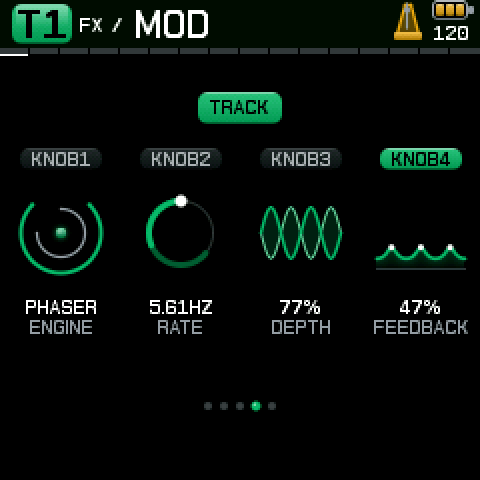
On MODULATION, RATE and DEPTH set the speed and amount of movement. FEEDBACK adds resonance and colour, especially with FLANGE and PHASER; zero leaves the effect uncoloured by feedback.
REVERB is shared by all tracks: its ENGINE, SIZE, DECAY and PRE DELAY affect the shared reverb, while each track's reverb SEND is set on the SENDS page. PRE DELAY sets when the reverb begins: AUTO derives it from the reverb settings, while 1/64T, 1/64, 1/32T, 1/64D, 1/32, 1/16T, 1/32D, 1/16, 1/8T, 1/16D and 1/8 follow the current tempo. The dry sound remains immediate. To hear the difference, use a short sound with ROOM and a high reverb SEND, set the tempo to 60 BPM, then compare 1/64T with 1/8. Allow a few seconds after changing the setting for the timing to settle.
On SENDS, hold OCT− and turn any knob to jump directionally between 0%, 50% and 100%. The cue appears below the four send bars. A snap gesture does not change octave; a plain OCT− tap still lowers the synth octave. Without the modifier, sends adjust continuously.
GLO (global)
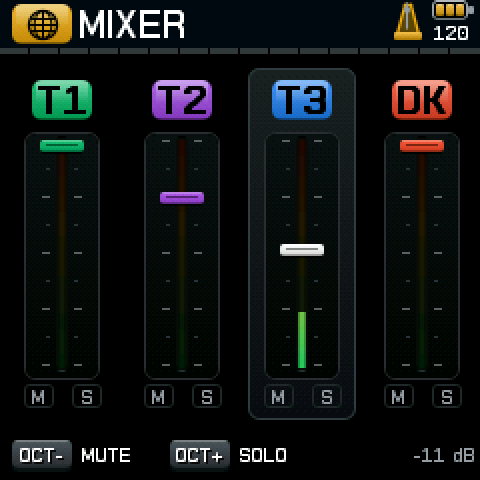
Press GLO repeatedly to visit the mixer and master screens. Press OCT− + GLO to open TEMPO; press GLO there to reach the MIDI pages. From TEMPO or either MIDI page, OCT− + GLO returns to the main GLOBAL mixer:
| Screen | Controls and use |
|---|---|
| MIXER | Track levels on knobs 1–4. Turning a level knob also selects that track, even when its level is already at a limit. OCT− mutes; OCT+ solos. |
| GLOBAL / PAN | Pan for T1, T2, T3 and DK. The centre marker indicates true centre. |
| GLOBAL / FILTER | FILTER, RESONANCE and ENV DEPTH. The fourth slot is inactive. SELECT and KNOB 1 edit the same master filter. |
| GLOBAL / HEAT | HEAT TYPE (BITCRUSH, SATURATE or TAPE WOW), AMOUNT. This is separate from each track's DRIVE. |
| COMPRESSOR | SOURCE, THRESHOLD, RATIO, MAKEUP. SOURCE offers OFF, ALL, TRACK 1–3 or KICK DRUM. |
| COMP TIME | ATTACK, HOLD, RELEASE, MIX. |
| TEMPO (hold GLO) | BPM, SWING, CLOCK SOURCE and MONITOR. The clock readout appears in the header, and the build number appears in the cue area. |
The global mixer's centre meter shows each track after its track effects and pan, before shared reverb, master compression and master output. Its top turns red at full scale and it decays after a peak. This is different from the individual drum-lane meters described under KIT LEVEL.
To jump to the master filter, hold GLO and turn SELECT. On GLOBAL / FILTER, make a fresh OCT− hold and turn KNOB 1 to snap toward the low-pass end, open midpoint or high-pass end. Keep holding OCT− and turn again to move between those points.
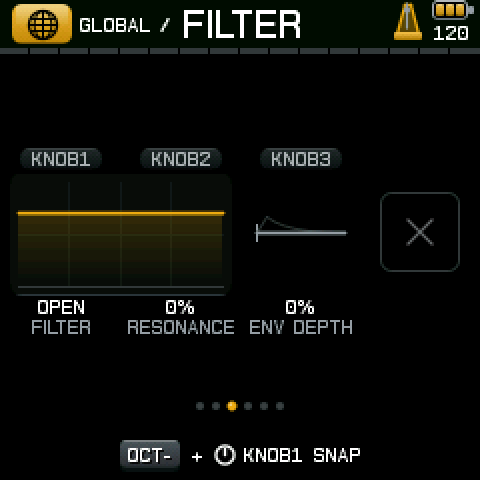
BPM and SWING are shared. MONITOR is described in section 6.
Compressor
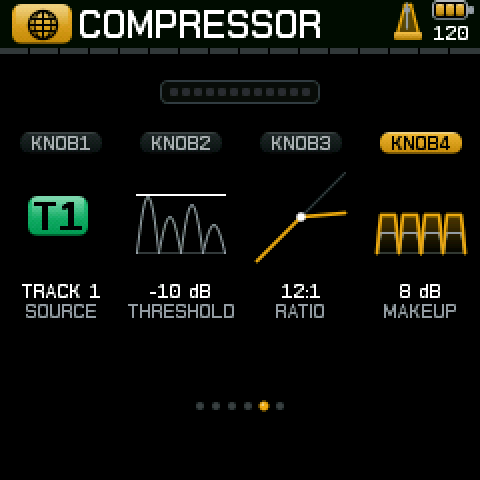
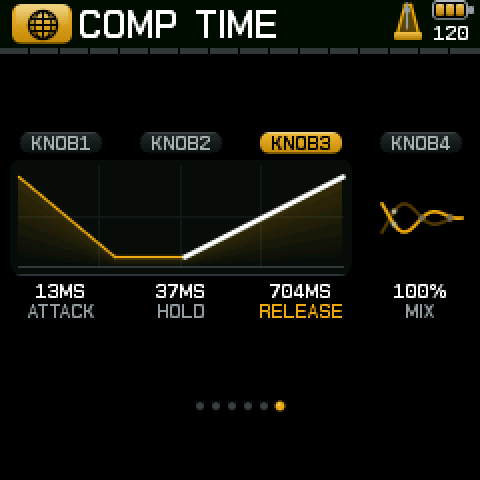
The global compressor controls the dynamics of the finished mix. Press GLO until you reach COMPRESSOR; press it again for COMP TIME. Both pages show a goldenrod gain-reduction meter above the controls: it shows how much the compressor is turning the signal down. On COMP TIME, the graph combines ATTACK, HOLD and RELEASE; turning a control highlights its section. MIX blends the compressed and uncompressed signals.
| Page | Control | What it does |
|---|---|---|
| COMPRESSOR | SOURCE | Chooses the signal that triggers compression: OFF, ALL, TRACK 1–3 or KICK DRUM. Choose a track or kick to make that signal drive compression of the mix. |
| COMPRESSOR | THRESHOLD | Sets the level above which the compressor begins reducing gain. |
| COMPRESSOR | RATIO | Sets how strongly signals above the threshold are compressed. 1:1 applies no compression. |
| COMPRESSOR | MAKEUP | Adds gain to the compressed signal. |
| COMP TIME | ATTACK | Sets how quickly compression responds to a rising signal. |
| COMP TIME | HOLD | Sets how long compression holds before releasing. |
| COMP TIME | RELEASE | Sets how quickly compression eases after the signal falls. |
| COMP TIME | MIX | Blends the compressed and uncompressed signals. |
For a pumping effect, try KICK DRUM as the source and adjust THRESHOLD, RATIO and RELEASE while the beat plays. Use the meter and your ears to set the amount of gain reduction.
SEQ: patterns and step editing
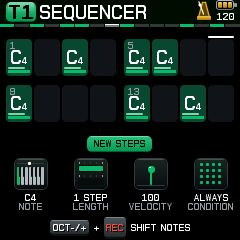
Press SEQ for the current track's grid. WHITE KEYS on the keyboard toggle 16 steps in the current bank; OCT− and OCT+ move between four banks, for up to 64 steps.
On patterns longer than 16 steps, the bottom cue alternates every 3 seconds between OCT−/+ + REC SHIFT NOTES and OCT−/+ STEP BANK.
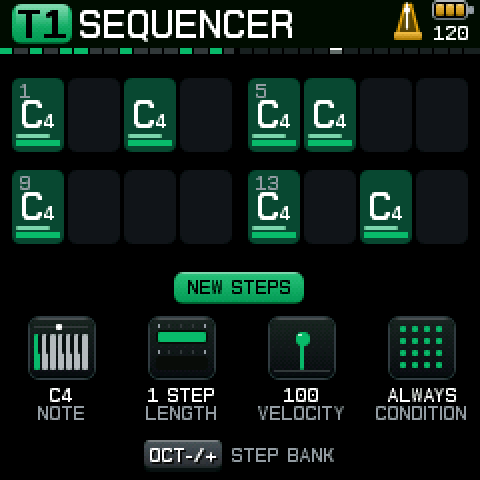
On DK, turn SELECT to choose D1–D4; WHITE KEYS toggle hits in that lane. On the FM-1 SEQ grid, black keys do not choose a lane or note. On a synth track, hold a step until its edit controls appear, then press another white key to set and audition that step’s pitch. On DK, PRESETS changes the selected lane’s voice. Knob settings without a held step are defaults for new steps, rather than edits to every existing hit.
Hold a step to edit NOTE, LENGTH, VELOCITY and CONDITION. OCT− and OCT+ nudge its timing earlier or later in 1/128-note increments. The display simplifies the offset to a musical fraction, such as +1/32 or −3/64. The available range depends on the track speed and swing, keeping the note within its neighboring step boundaries. Holding SEQ with a step makes it a fill step. Conditions include ALWAYS, probabilities, FIRST PASS, REPEATS, AFTER HIT, AFTER MISS, NEIGHBOR, ALONE, FILL, NO FILL and A-of-B patterns.
To shift every note in the current track by one step, hold REC and press OCT− or OCT+. Keep holding REC to shift again. Notes that pass the first or last step wrap around the track’s sequence. On DK, all four drum lanes move together; timing and other step settings move with each note.
To copy a step, hold an active step and press REC. Hold a destination step and press PLAY to paste. Synth steps paste to synth tracks and drum steps to drum lanes; the step’s edits come with it. With no copied step, PLAY retains its transport function.
Press SEQ again for STEPS, SPEED, QUANTIZE. STEPS is the pattern length; SPEED selects 1/8, 1/16 or 1/32; QUANTIZE controls recording-time quantisation. Hold SEQ and turn KNOB 1 as a shortcut to pattern length. REC arms recording; PLAY starts or stops playback.
ARP: synth arpeggiator
On T1–T3, press ARP for MODE, RATE, OCTAVES, GATE. Hold ARP for 0.8 seconds to toggle the arpeggiator. While it is on, the ARP page shows an ARP: ON badge. HOLD sustains notes after you release the keys.
MODE offers UP, DOWN, UP AND DOWN, RANDOM and MANUAL. MANUAL follows the order you played the notes. RATE offers 1/8, 1/8T, 1/16, 1/16T and 1/32. The 3 beside the note icon means a triplet; straight rates follow global swing. GATE sets each arpeggiated note's length as a fraction of the interval.
RETRIGGER: repeated drum hits
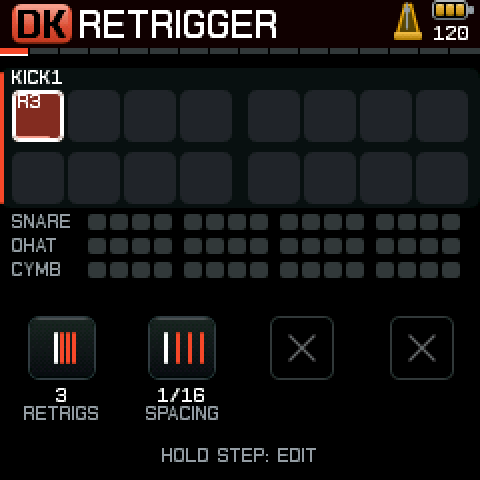
On DK, ARP opens RETRIGGER, with all four drum lanes visible. It does not open the synth arpeggiator.
- Pick the drum lane. The first four BLACK KEYS choose D1, D2, D3 and D4, from left to right. You can also turn SELECT.
- If the pattern is longer than 16 steps, press OCT− or OCT+ to show the bank of steps you want.
- Hold a lit white step key. An empty step does not audition or accept a retrigger edit.
- Turn KNOB 1, RETRIGS, for 0–7 extra hits. OFF means no repeats beyond the original hit.
- Turn KNOB 2, SPACING, for the interval between hits: 1/128, 1/64, 1/32, 1/16, 1/8, 1/4, 1/2 or 1/1 note.
- Release the step to finish editing. Turning those knobs without holding a lit step does not edit it.
White marks in a hit cell show assigned retriggers. Active step keys are medium brightness, with the held step and playhead brighter. A later hit in the same lane replaces any remaining repeats. The original hit's condition is checked once; repeats do not roll its probability again. Retriggers save with the project.
SEL: SOUNDS and DRUM KITS
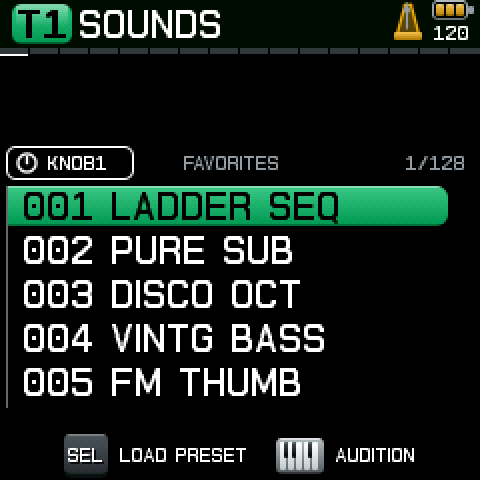
On a synth track, SEL opens SOUNDS: 128 sounds, starting with 32 favorites and followed by categories for bass, leads, keys, pads and more. On DK it opens DRUM KITS: 12 starting points for BRAIDS and PLAITS, including 80S and 90S sounds.
Turn KNOB 1, SELECT or PRESETS to browse the five visible rows. The highlighted entry is auditioned by the keys and by a running sequence. The knob chip lights in the track colour while you scroll. Press SEL again when the cue reads LOAD PRESET to keep that entry. Leaving before keeping it restores the previous sound. The drum browser preserves the sequence, lane voice choices and levels.
LFO
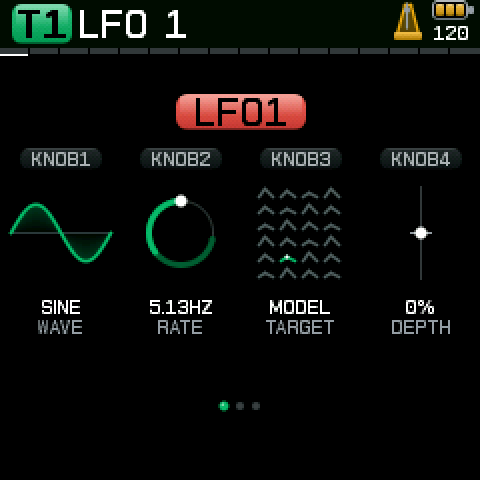
Two LFOs per track, each with WAVE, RATE, TARGET, DEPTH. WAVE offers SINE, TRIANGLE, SAW, SQUARE and SAMPLE HOLD. The target menu follows the selected engine; on a Plaits synth track, MODEL steps through the models around the current sound. DEPTH sets how far it moves. The display uses MORPH for the relevant Plaits control. Route badges show which LFO or patch is affecting a parameter, with colour and pulsing to distinguish them.
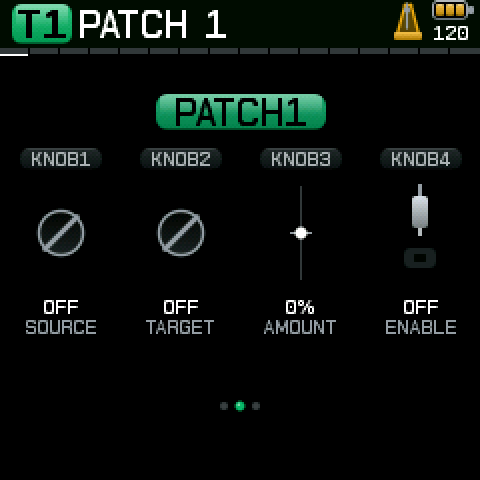
Press LFO to cycle through LFO 1, LFO 2 and GLOBAL LFO. The global LFO is shared across the instrument; its targets include the global filter and resonance, heat, compressor controls, and reverb size and decay. Press EDIT to cycle through KIT LEVEL, PATCH 1 and PATCH 2. Each track has its own patches, including the drum kit. Each patch has SOURCE, TARGET, AMOUNT and ENABLE; negative amounts invert the route. On a synth track, its targets match the track LFO targets, including MODEL and the arpeggiator controls. In HOME’s MOD DEPTHS page, scale modulation for TIMBRE, HARMONICS, MORPH and PITCH.
EDIT: KIT LEVEL
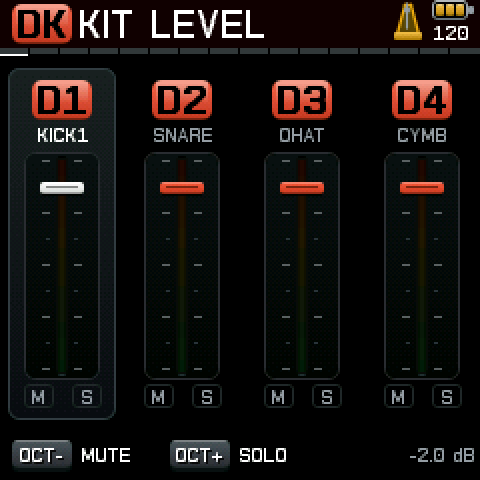
Select DK, then press EDIT to open the drum KIT LEVEL mixer. Each knob controls D1–D4 and selects that lane. PRESETS changes its voice. OCT− toggles mute; OCT+ toggles solo. The four strips show matching D1–D4 badges, short voice names and M/S indicators. Keyboard keys and ALGORITHM are inactive here. Use the track’s PATCH pages under EDIT, and the kit’s ENV and LFO pages for modulation.
Several drum lanes can be soloed together. Solo excludes only the other drum lanes, so synth tracks keep playing. Mute takes precedence over solo. The underlying lane levels are preserved; existing effect tails may continue to decay. Lane mutes save with the project; solos clear on load.
KIT LEVEL meters show individual lanes before the kit's shared track-effects chain. The global mixer's DK meter shows the summed kit after that chain. Lane names use a five-character maximum, including KICK1, SNARE, OHAT, CHAT, CYMB and TOM.
Modulation: how routes interact
The source labels describe these signals:
| Source | Meaning |
|---|---|
| OSC AVG / MIX AVG | Signed averages from the preceding audio block. They are not audio-rate oscillator or mix patch outputs. |
| AMP ENV / FILTER ENV | The amplitude or filter envelope. |
| LFO 1 / LFO 2 | The selected waveform of that LFO. Dedicated TRI and SQU sources provide its triangle or square signal. |
| GLOBAL LFO | The shared LFO waveform. PATCH AMOUNT sets its depth independently of the global LFO’s own DEPTH setting. |
| VELOCITY / NOTE | The most recently played note's velocity or pitch. |
| RANDOM | A new random signal each audio block. |
| RANDOM PER NOTE | A new value on each note-on, held until the next. Polyphonic voices and drum lanes on the same track share the most recent value. |
| GATE | High during the filter envelope's attack, decay and sustain stages. |
Targets include pitch, the engine's sound controls, FILTER FREQUENCY, FILTER RESONANCE, TRACK LEVEL and TRACK PAN, the amp envelope, DRIVE SEND, DELAY SEND, MOD FX SEND, REVERB SEND and the LFO and arpeggiator controls. Choices depend on the engine. Kit modulation signals are shared by the kit, rather than independent per drum lane.
LFO and PATCH routes can contribute to the same destination. MOD DEPTHS scales the combined modulation applied to TIMBRE, HARMONICS, MORPH and PITCH. At 0% it passes unchanged; +50% makes it one and a half times as strong, −50% halves it, and −100% removes it. The sign of the underlying route is preserved.
A valid enabled PATCH sourced from FILTER ENV replaces the envelope SETUP direct route, even when its amount is zero or its destination is different. ARP destinations do not replace that direct route. Disable that patch to restore the direct route. HOME filter ENV DEPTH remains an independent filter contribution. Track filter modulation can sweep through the open center between low-pass and high-pass.
PUNCH FX
Hold the RIGHTMOST BLACK KEY on the keyboard and press another black effect key. One group runs at a time while its effect keys are held; releasing them ends that effect. Releasing the RIGHTMOST BLACK KEY on the keyboard returns to the page you were using. Punch effects act on the finished mix and use the global goldenrod colour. ECHO is unavailable while polyphonic voices use its delay memory; the screen shows ECHO UNAVAILABLE IN POLY.
| Group | Effect keys, counting from key 0 at the left | Settings |
|---|---|---|
| LOOP | 1, 3, 5 | Loop length: 1 bar, 1/2, 1/4 or 1/8 bar. |
| ECHO | 8, 10 | Time and feedback. |
| FILTER | 13, 15, 17 | Low-pass/high-pass shape and amount. |
| TREMOLO | 20, 22 | Rate and depth. |
The hold key is key 25. OCT− and OCT+ move between two Punch settings pages. The active group's name and parameter are highlighted; LOOP returns to the first page because it has no second-page control.
While playing, the hold key is one brightness step above idle BLACK KEYS on the keyboard. Holding it dims the WHITE KEYS on the keyboard and lights the effect keys; the active group's lights chase from left to right. Punch is available on performance pages; the step grid and SAVE screens retain their own key roles.
4. Gestures and shortcuts
| Gesture | Result |
|---|---|
| Hold HOME for 0.8 seconds | Toggle HOLD. |
| Hold ARP for 0.8 seconds on a synth | Toggle the arpeggiator. |
| Hold GLO, turn SELECT | Jump to the master filter and sweep it. |
| Fresh OCT− hold on GLOBAL / FILTER, turn KNOB 1 | Snap the filter to an end or the open midpoint. |
| Hold OCT−, turn a knob on FX SENDS | Snap that send to 0%, 50% or 100%. |
| Hold SEQ, turn KNOB 1 | Change pattern length. |
| OCT− + GLO | Open TEMPO, or return from TEMPO or MIDI to the GLOBAL mixer. |
| OCT− + SEQ | Open PATTERNS, or return from PATTERNS or ARRANGE to SEQUENCER. |
| Hold an active SEQ step + REC; hold a compatible destination step + PLAY | Copy and paste a step. |
| Hold a SEQ step, turn knobs | Edit that step's note, length, velocity and condition. |
| Hold a SEQ step, press OCT− / OCT+ | Nudge its timing. |
| Hold SEQ with a step | Make it a fill step. |
| Hold a lit drum step on RETRIGGER | Edit RETRIGS and SPACING with knobs 1 and 2. |
| Turn a mixer level knob | Adjust its level and select its track or drum lane. |
| Hold the RIGHTMOST BLACK KEY on the keyboard | Use Punch FX. |
5. Saving, projects and Editor
Save and load
SAVE opens the SAVE menu: QUICKSAVE, SAVE AS, LOAD and INIT. Follow the bottom cues: SAVE confirms or quick-saves where offered; PLAY cancels. Quick-save writes the current slot. If no current slot is selected, choose a slot and name to save first. There are 12 slots and project names can contain up to 12 characters. Knobs 1 and 2 edit the name. Project-list selections use global goldenrod.
Loading with unsaved changes opens SAVE FIRST?. INIT starts a blank project after confirmation. Stop playback before saving or initializing. These actions stop lingering notes and effect tails. If REC is armed, it pauses during the operation and is armed again afterward. Save before switching off.
Project storage
Projects contain the session and pattern bank. Retriggers and lane mutes save with the project; lane solos clear on load. Drum GATE is temporary and returns to OPEN when a session loads. Use the Editor to download your saved projects and keep the backup somewhere safe. Save current edits on the instrument first.
Project compatibility. If a project cannot be loaded, keep a verified backup and do not overwrite a slot whose contents you need.
Backups and recovery
Save your current edits, then use the Editor to download all saved projects before changing firmware. Keep that backup somewhere safe: returning to stock firmware can clear every JamesOS project slot. After reinstalling JamesOS, restore each project to its chosen slot and load it on the instrument. If installation fails, see the FM-1 rescue guide.
Projects made with JamesOS 1.0a
Projects saved with 1.0a do not load directly in 1.0b. The instrument lists them as OLD FORMAT. Updating does not erase them, but saving over such a slot replaces the old project. Convert them with the Editor.
- Before you update, save any work you want to keep into a named slot. Only saved slots can be converted, not unsaved edits.
- Keep your own backup if you have one.
- After updating, open the Editor, connect the FM-1 and select the old project. The Editor marks it as an older project format.
- Choose Download original and keep that file. The slot on the instrument is not changed.
- Choose Download upgraded project and read the notes the Editor shows.
- Select an empty slot, choose the upgraded file and confirm. Then load that slot on the instrument.
- Listen to the result. Keep the original until you are happy with it.
Conversion can approximate some settings, or refuse a project it cannot convert safely. It does not promise the same sound: the mix, filter, reverb, delay and drum kits changed in 1.0b, so a converted project can sound a little different. Projects saved by 1.0b cannot be opened by 1.0a.
Patterns and arrangement
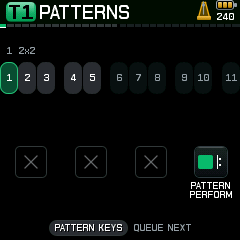
Each project stores up to eleven patterns, subject to available project storage. Press OCT− + SEQ to open PATTERNS; from PATTERNS or ARRANGE, press it again to return to SEQUENCER. The eleven black keys select patterns; during playback a selection queues for the next bar. To create a repeating chain, hold the first pattern key, tap each following pattern key in order, then release the first key. Tap a pattern again to repeat it in the chain. A single pattern press ends the chain. Hold a source pattern key and press REC to copy, then hold a destination key and press PLAY to paste.
On PATTERNS, turn KNOB 4 from PATTERN to ARRANGE to open ARRANGER; stop playback before changing modes. Turn KNOB 1 to move the cursor between blocks and gaps. Press a black key on a block to change its pattern, or at a gap or END to insert a block. KNOB 2 sets the selected block’s length, or the length of the next block when the cursor is at a gap or END. KNOB 3 switches whole-arrangement LOOP MODE on or off. Hold OCT− and press REC to remove the selected block. PLAY starts at the cursor, or at the beginning when the cursor is at END. Turn KNOB 4 back to PATTERN to select or queue patterns with the black keys.
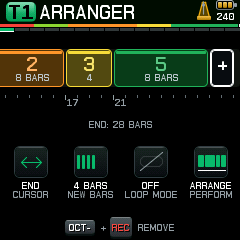
An arrangement can contain up to 64 blocks, with 1–16 bars per block. Save the project to keep its pattern bank and arrangement.
Editor: project transfer
The JamesOS Editor moves saved projects between a compatible FM-1 and a computer. The Editor checks that the connected firmware supports project transfer. In Chrome or Edge, connect the powered-on instrument by USB, open Editor and allow MIDI access. Choose Connect FM-1, then select a saved slot. Save changes on the instrument first: the Editor transfers saved projects, not unsaved changes.
Choose Download project to save the selected slot as a .jproject file. Download all saved projects downloads a ZIP with a separate project file for each occupied slot; empty slots are skipped. To restore one, extract it from the ZIP, select a destination slot, choose the .jproject file, review the replacement and confirm. Loading replaces the saved slot but does not open it on the FM-1; load the slot on the instrument to play it. When the connected firmware supports deletion, the Editor enables Delete project. Deleting permanently removes the selected slot; download a copy first if you want to keep it.
Polyphony
With the sequencer stopped, select a synth on the first HOME page and press OCT− + PLAY to toggle polyphony. The HOME badge shows MONO or POLY and the available voice count. The selected synth can play chords; the number of simultaneous voices depends on the sound engine and modulation settings. The other synth tracks and drums are unavailable while the voices are in use; their settings and sequences are retained. Starting playback restores the normal track engines; HOME shows “POLYPHONY OFF DURING PLAYBACK” while the sequencer runs. Some polyphonic configurations use delay memory for additional voices; punch echo is unavailable while that memory is in use. When playback stops, the return to polyphony waits until held synth notes and the selected track’s audible release finish.
6. The CPU monitor
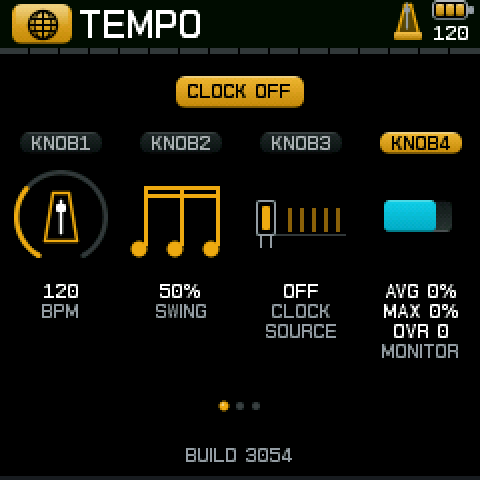
Press OCT− + GLO to open TEMPO and turn KNOB 4, MONITOR, to ON. It uses the same ON/OFF toggle style as other settings. Its setting is saved with the project.
If two or more audio overruns occur within four bars, the instrument enables MONITOR and shows CPU USAGE HIGH. MONITOR ENABLED. once per power-on session.
The bottom two pixel rows show the average audio load, with a marker for the maximum. The meter turns red after an overrun. The MONITOR card shows AVG, MAX and OVR.
This is an average, not a guarantee against a slow individual block. If you hear clicks and the meter is near the limit, reduce effect sends or simplify the sound. The global mixer and KIT LEVEL show signal level; this bottom bar shows processor load.
7. MIDI and USB audio
MIDI input channels can be assigned to T1–T3 and drum lanes D1–D4. Program Change chooses an engine or kit; CC 7 controls synth track or drum-lane level, CC 71 controls COLOR/MORPH and CC 74 controls TIMBRE. MIDI Start, Continue and Stop control the sequencer, and USB/MIDI clock can be selected as the timing source. See the MIDI chart.
USB audio output is stereo, 16-bit. The sound engine runs at 44.1 kHz and the USB audio device presents 48 kHz to the computer.
8. Specifications and limits
| Item | Limit |
|---|---|
| Tracks | 3 synth tracks and 1 drum track with 4 lanes. |
| Synth engines | 24 Plaits engines. |
| Kit engines | BRAIDS and PLAITS. The 80S and 90S starting kits use PLAITS. |
| Starting sounds | 128 synth sounds and 12 drum-kit starting points. |
| Sequencer | Up to 64 steps per track, in four banks of 16. |
| Tempo | 60–240 BPM. |
| Retriggers | Up to 7 extra hits per drum step. |
| Projects | 12 slots; names up to 12 characters; each project contains a pattern bank. |
| Modulation | 2 LFOs and 2 PATCH slots per track, plus 1 global LFO. Modulation is evaluated at block rate. |
| Reverb | One shared tank; per-track sends. |
| Audio | 44.1 kHz internally; stereo 16-bit USB audio at 48 kHz. |
| Processing | 256-frame audio blocks; heavy projects can approach the real-time deadline. |
9. Troubleshooting
| Problem | What to check |
|---|---|
| No sound from a track | Its global mixer level, mute and solo states, plus the hardware volume. |
| One drum lane is silent | KIT LEVEL's lane level, M/S state, chosen voice, GATE and that step's length. A mute takes precedence over solo. |
| The drum knobs do nothing | On RETRIGGER, hold a lit step first. On HOME, the available knobs depend on whether BRAIDS or PLAITS is selected. |
| ALGORITHM does nothing on the drum mixer | Leave KIT LEVEL before changing track. |
| A filter-envelope route seems inactive | Check whether an enabled PATCH using FILTER ENV has replaced the direct route. |
| Clicks or dropouts | Enable MONITOR and simplify effects or sound settings if load approaches the limit. |
| SAFE AUDIO: SAVE+RESTART | The instrument has fallen back to one audio core. Save your work and restart; polyphony is unavailable in this state. |
| STORE FULL | The project cannot fit in the available storage. Reduce its contents, then try saving again; keep another backup. |
| OLD FORMAT or OLD PROJECT NOT LOADED | The project format is not supported. Preserve your backup and do not overwrite a slot you need; see project storage. |
A protection flag is reported 0x02 | Keep your full backup and do not overwrite protected data until the cause is identified and resolved. |
| The FM-1 is stuck after an update | Keep your backup and follow the FM-1 rescue guide for the device mode you see. |
| A project fails to load | Preserve your work and backup, note the firmware build number and report what happened. |
MIDI implementation
JamesOS receives MIDI over USB and the FM-1’s 3.5 mm MIDI IN jack. Use a compatible 5-pin MIDI-to-3.5 mm adapter to connect an external sequencer or controller. JamesOS also appears to the computer as a USB-MIDI and USB-audio device.
Routing and clock
Press OCT− + GLO to open TEMPO, and use knob 3 to select CLOCK SOURCE. Press GLO once for MIDI / 1, where knobs 1–3 set the input channels for T1–T3. Press GLO for MIDI / 2, where knobs 1–4 assign D1–D4. The defaults are channels 1–3 for T1–T3 and 4–7 for D1–D4. Each destination can use any channel 1–16, including a shared channel, or OFF to disable its MIDI input and keyboard MIDI output. Any note on a drum lane’s assigned channel triggers that lane’s selected voice. Channel 10 needs an explicit assignment. These settings are saved with the session.
With CLOCK SOURCE set to USB/MIDI, the FM-1 follows clock and transport received over USB or the MIDI IN jack. Use one clock source at a time. It waits for a stable incoming MIDI clock and stops playback if clock is lost. Start begins at the beginning. Continue resumes the locally stopped position. Song Position Pointer (F2) stops synchronized playback and requires a new Start.
Messages received
| Message | Effect |
|---|---|
| Note On (velocity above 0) | Plays a note on the track; velocity sets level. While REC is armed it is recorded into the pattern. |
| Note Off, or Note On with velocity 0 | Releases the note. |
| Program Change | Loads a sound onto the track (below). A number the track cannot take shows PRESET ROLE LOCKED. |
| CC 7 | Synth track level or assigned drum-lane level (0 to 127). |
| CC 71 | Track COLOR (0 to 127). |
| CC 74 | Track TIMBRE (0 to 127). |
| CC 120, CC 123 | All sound off or all notes off for that track. |
| Start (0xFA) | Start the sequencer. |
| Continue (0xFB) | Resume the locally stopped position. |
| Stop (0xFC) | Stop the sequencer. |
| Clock (0xF8) | Supply timing when USB/MIDI clock is selected. |
Pitch bend, aftertouch, modulation wheel, RPN/NRPN and bank select are not implemented.
Program numbers
| Program | Sound | Tracks |
|---|---|---|
| 52 to 75 | The 24 synth engines, in the order of the table below | Synth tracks 1 to 3 |
| 48 | BRAIDS KIT | Drum track |
| 76 | PLAITS KIT | Drum track |
Programs 0 to 47 and 49 to 51 are not selectable on these tracks. Select the 80S and 90S kits in DRUM KITS. The 128 bank sounds on the SEL page are sets of settings, not program numbers.
| Program | Engine | Program | Engine | Program | Engine |
|---|---|---|---|---|---|
| 52 | ANALOG VCF | 60 | VIRTUAL AN | 68 | SWARM |
| 53 | PHASE DIST | 61 | WAVESHAPE | 69 | NOISE |
| 54 | FM BASS | 62 | FM | 70 | PARTICLE |
| 55 | FM KEYS | 63 | GRAIN | 71 | STRING |
| 56 | FM PAD | 64 | HARMONIC | 72 | MODAL |
| 57 | WAVE TERRAIN | 65 | WAVETABLE | 73 | KICK |
| 58 | STRING MACH | 66 | CHORD | 74 | SNARE |
| 59 | CHIPTUNE | 67 | SPEECH | 75 | HI HAT |
Drum notes
Any note received on a drum lane’s assigned MIDI channel plays that lane. Choose the lane’s voice with PRESETS on the drum sequencer, KIT LEVEL or RETRIGGER. If multiple lanes share a channel, a note triggers each assigned lane.
Messages sent
When you play the keyboard, JamesOS sends Note On (velocity 100) and Note Off on the track's channel, so a DAW or other synth can follow what you play. Keyboard output uses USB MIDI channels 1–3 for synth tracks and channel 4 for drums. Channel assignments do not change these output channels, but setting a track or drum lane to OFF suppresses its keyboard MIDI output. It does not send clock, CC, or Program Change.
System exclusive
USB SysEx is used by the installer, compatible Editor project transfers and diagnostic tools. JamesOS also supports the FM-1 community screen-reader protocol over USB MIDI: a compatible screen reader can announce the current screen, controls and status messages. The device stays silent until a reader connects. To use it, connect the instrument by USB, open the FM-1 Screen Reader page in Chrome or Edge and choose Connect. SysEx received through the MIDI IN jack is ignored. Avoid sending unrelated SysEx during an update.
Audio
USB audio output, stereo, 16-bit. The instrument renders at 44.1 kHz; the computer sees a 48 kHz device.